iOS - Runtime 详解
0. 概述
Objective-C Runtime 使得C具有了面向对象的能力,在程序运行时创建,检查,修改类,对象和它们的方法。Runtime 是 C和汇编写的,这里http://www.opensource.apple.com/source/objc4/可以下载Apple维护的开源代码,GUN也有一个开源的Runtime版本,它们都努力保持一致。Apple官方的runtime编程指南
对于 C 语言,函数的调用会在编译期就已经决定好,在编译完成后直接顺序执行。但是 OC 是一门动态语言,函数调用变成了消息发送,在编译期不能知道调用哪个函数,Runtime 就是去解决如何在运行时期找到调用方法的问题。
1、Runtime 函数
Runtime 系统是由一系列的函数和数据结构组成的公共接口动态共享库,在/user/includeobjc 目录下可以看到头文件,可以用到其中一些函数通过C语言实现Objective-C中一样的功能。苹果官方文档 里有详细的Runtime 函数文档。
2. Class 和 NSObject 基础数据结构
2.1 Class
objc_class 结构体的定义如下:
//-------- [file:objc-runtime-new.h] --------
struct objc_class : objc_object {
    // Class ISA;
    Class superclass;
    cache_t cache;             // formerly cache pointer and vtable
    class_data_bits_t bits;    // class_rw_t * plus custom rr/alloc flags
    ......
}
2.2 objc_object
objc_object 是一个类的实例结构体,objc/objc.h 中 objc_object是一个类的实例结构体定义如下:
//-------- [file:objc-private.h] --------
typedef struct objc_class *Class;
typedef struct objc_object *id;

struct objc_object {
private:
    isa_t isa;
    ......
}

union isa_t
{
    ......
    Class cls;
    uintptr_t bits;
    ......
}
向object发送消息时,Runtime 库会根据object的isa指针找到这个实例object所属于的类,然后在类的方法列表以及父类的方法列表中寻找对应的方法运行。id 是一个objc_object结构类型的指针,这个类型的对象能转换成任何一种对象。
2.3 cache_t
cache_t 结构体中cache字段用于缓存调用过的method。cache指针指向cache_t结构体,这个结构体定义如下:
struct cache_t {
    struct bucket_t *_buckets;
    mask_t _mask;
    mask_t _occupied;
};
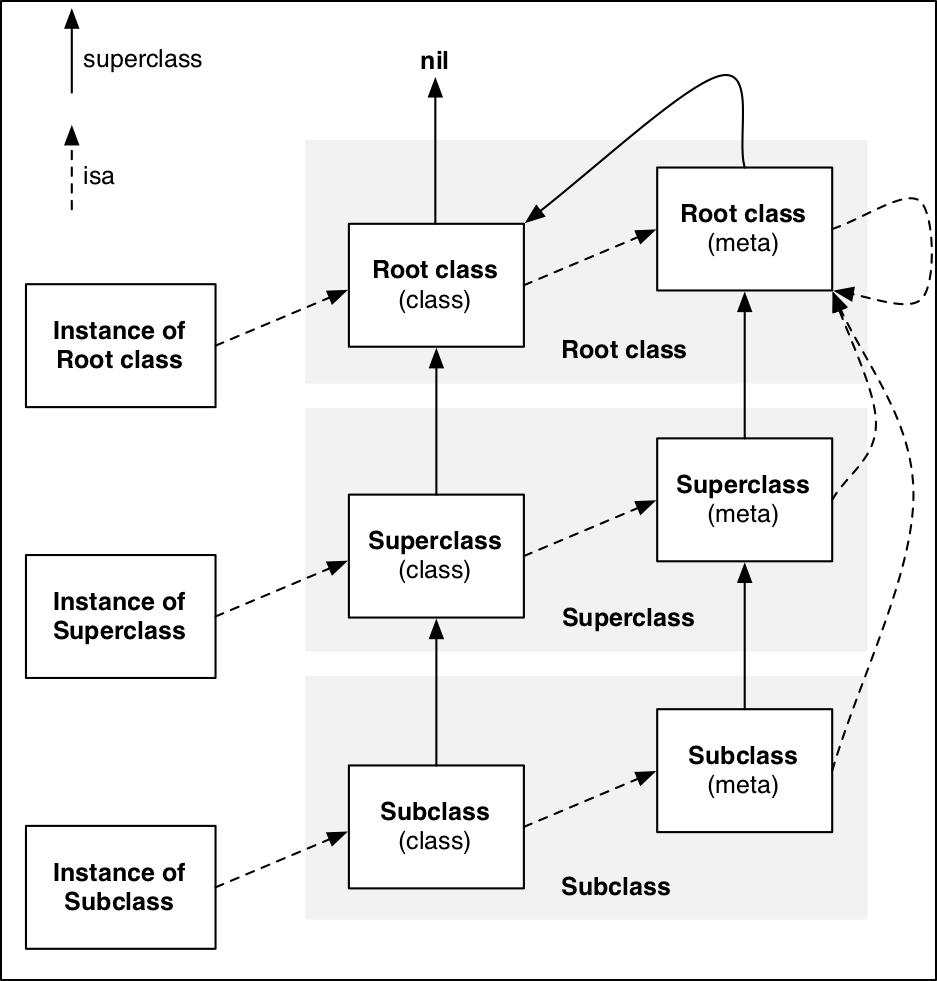
2.4 Meta Class
meta class 是一个类对象的类,
- 当向对象发送消息时,runtime 会在这个对象所属类方法列表中查找发送消息对应的方法;
- 但当向类发送消息时,runtime 就会在这个类的
meta class方法列表中查找。
所有的 meta class,包括Root class,SuperClass, SubClass的isa都指向 Root class 的 meta class,这样能够形成一个闭环。
3.Runtime 类与对象操作函数
Runtime 有很多函数可以操作类和对象。类相关的是class为前缀,对象相关相关的函数是 objc 或者 object 为前缀。
3.1类相关操作函数
name
// 获取类的类名
const cahr * class_getName (Class cls);
super_class 和 meta_class
// 获取类的父类
Class class_getSuperclass (Class cls);

// 判断给定的Class是否是一个meta class
BOOL class_isMetaClass (Class cls);
instance_size
// 获取实例大小
size_t class_getInstanceSize (Class cls);
3.2 成员变量(ivars)及属性
3.2.1 成员变量操作函数
// 获取类中指定名称实例成员变量的信息
Ivar class_getInstanceVariable (Class cls, const char *name);

// 获取类成员变量的信息
Ivar class_getClassVariable (Class cls, const char *name);

// 添加成员变量
BOOL class_addIvar (Class cls, const char *name, size_t size, uint8_t alignment, const char *types);  //只能向在runtime时创建的类添加成员变量,这个方法只能在objc_allocateClassPair函数与objc_registerClassPair之间调用。另外,这个类也不能是元类。

// 获取整个成员变量列表
Ivar * class_copyIvarList (Class cls, unsigned int *outCount); // 必须使用free()来释放这个数组
测试成员变量
//成员变量
- (void)testIvar {
    BOOL isSuccessAddIvar = class_addIvar([NSString class], "_phone", sizeof(id), log2(sizeof(id)), "@");
    if (isSuccessAddIvar) {
        NSLog(@"Add Ivar success");
    }else{
        NSLog(@"Add Ivar error");
    }
    unsigned int outCount;
    Ivar *ivarList = class_copyIvarList([People class], &outCount);
    for (int i = 0; i < outCount; i++) {
        Ivar ivar = ivarList[i];
        const char *ivarName = ivar_getName(ivar);
        const char *type = ivar_getTypeEncoding(ivar);
        ptrdiff_t offset = ivar_getOffset(ivar);
        NSLog(@"ivar:%s, offset:%zd, type:%s", ivarName, offset, type);
    }
}
3.2.2 属性操作函数
// 获取指定的属性
objc_property_t class_getProperty(Class cls, const char *name);

// 获取属性列表
objc_property_t * class_copyPropertyList(Class cls, unsigned int *outCount);

// 为类添加属性
BOOL class_addProperty (Class cls, const char *name, const objc_property_attribute_t *attributes, unsigned int attributeCount);

// 替换类的属性
void class_replaceProperty (Class cls, const char *name, const objc_property_attribute_t *attributes, unsigned int attributeCount);
针对ivar来操作的,不过它只操作那些property的值,包括扩展中的property。
测试属性
- (void)testProperty {
    objc_property_attribute_t attribute1 = {"T", "@\"NSString\""};
    objc_property_attribute_t attribute2 = {"C", ""};
    objc_property_attribute_t attribute3 = {"N", ""};
    objc_property_attribute_t attribute4 = {"V", "_addProperty"};
    objc_property_attribute_t attributesList[] = {attribute1, attribute2, attribute3, attribute4};
    BOOL isSuccessAddProperty = class_addProperty([People class], "addProperty", attributesList, 4);
    if (isSuccessAddProperty) {
        NSLog(@"Add Property Success");
    }else{
        NSLog(@"Add Property Error");
    }
    unsigned int outCount;
    objc_property_t * propertyList = class_copyPropertyList([People class], &outCount);
    for (unsigned int i = 0; i < outCount; i++) {
        objc_property_t property = propertyList[i];
        const char *propertyName = property_getName(property);
        const char *attribute = property_getAttributes(property);
        NSLog(@"propertyName: %s, attribute: %s", propertyName, attribute);
        unsigned int attributeCount;
        objc_property_attribute_t *attributeList = property_copyAttributeList(property, &attributeCount);
        for (unsigned int i = 0; i < attributeCount; i++) {
            objc_property_attribute_t attribute = attributeList[i];
            const char *name = attribute.name;
            const char *value = attribute.value;
            NSLog(@"attribute name: %s, value: %s",name,value);
        }
    }
}
运行结果
2018-05-01 17:14:52.957653+0800 RuntimeDemo[24515:910260] Add Property Success
2018-05-01 17:14:52.957871+0800 RuntimeDemo[24515:910260] propertyName: addProperty, attribute: T@"NSString",C,N,V_addProperty
2018-05-01 17:14:52.958034+0800 RuntimeDemo[24515:910260] attribute name: T, value: @"NSString"
2018-05-01 17:14:52.958175+0800 RuntimeDemo[24515:910260] attribute name: C, value:
2018-05-01 17:14:52.958309+0800 RuntimeDemo[24515:910260] attribute name: N, value:
2018-05-01 17:14:52.958452+0800 RuntimeDemo[24515:910260] attribute name: V, value: _addProperty
2018-05-01 17:14:52.958575+0800 RuntimeDemo[24515:910260] propertyName: name, attribute: T@"NSString",C,N,V_name
2018-05-01 17:14:52.958732+0800 RuntimeDemo[24515:910260] attribute name: T, value: @"NSString"
2018-05-01 17:14:52.958850+0800 RuntimeDemo[24515:910260] attribute name: C, value:
2018-05-01 17:14:52.958983+0800 RuntimeDemo[24515:910260] attribute name: N, value:
2018-05-01 17:14:52.959096+0800 RuntimeDemo[24515:910260] attribute name: V, value: _name
2018-05-01 17:14:52.959225+0800 RuntimeDemo[24515:910260] propertyName: age, attribute: T@"NSNumber",&,N,V_age
2018-05-01 17:14:52.959319+0800 RuntimeDemo[24515:910260] attribute name: T, value: @"NSNumber"
2018-05-01 17:14:52.959420+0800 RuntimeDemo[24515:910260] attribute name: &, value:
2018-05-01 17:14:52.959646+0800 RuntimeDemo[24515:910260] attribute name: N, value:
2018-05-01 17:14:52.959847+0800 RuntimeDemo[24515:910260] attribute name: V, value: _age
2018-05-01 17:14:52.960024+0800 RuntimeDemo[24515:910260] propertyName: sex, attribute: TQ,N,V_sex
2018-05-01 17:14:52.960186+0800 RuntimeDemo[24515:910260] attribute name: T, value: Q
2018-05-01 17:14:52.960365+0800 RuntimeDemo[24515:910260] attribute name: N, value:
2018-05-01 17:14:52.960584+0800 RuntimeDemo[24515:910260] attribute name: V, value: _sex
2018-05-01 17:14:52.960737+0800 RuntimeDemo[24515:910260] propertyName: address, attribute: T@"NSString",C,N,V_address
2018-05-01 17:14:52.960928+0800 RuntimeDemo[24515:910260] attribute name: T, value: @"NSString"
2018-05-01 17:14:52.961101+0800 RuntimeDemo[24515:910260] attribute name: C, value:
2018-05-01 17:14:52.961274+0800 RuntimeDemo[24515:910260] attribute name: N, value:
2018-05-01 17:14:52.961463+0800 RuntimeDemo[24515:910260] attribute name: V, value: _address
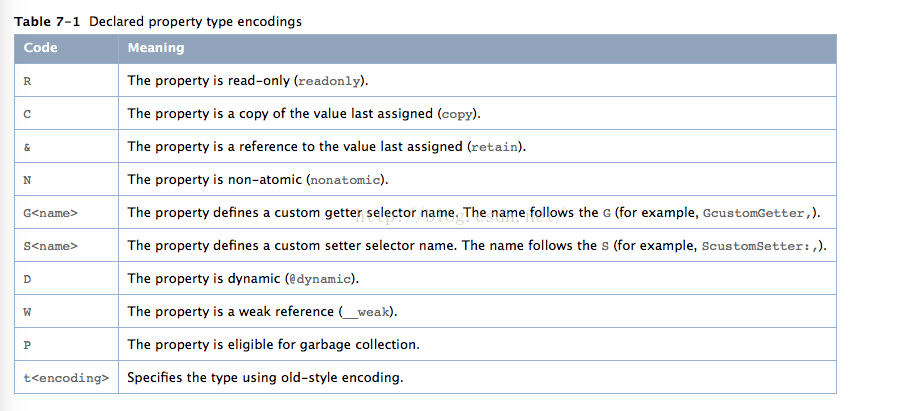
T 是固定的,放在第一个
@”NSString” 代表这个property是一个字符串对象
& 代表强引用,其中与之并列的是:’C’代表Copy,’&’代表强引用,’W’表示weak,assign为空,默认为assign。R 代表readOnly属性,readwrite时为空
N 区分的nonatomic和atomic,默认为atomic,atomic为空,’N’代表是nonatomic
V_exprice V代表变量,后面紧跟着的是成员变量名,代表这个property的成员变量名为_exprice
3.2.3 协议相关函数
// 添加协议
BOOL class_addProtocol ( Class cls, Protocol *protocol );

// 返回类是否实现指定的协议
BOOL class_conformsToProtocol ( Class cls, Protocol *protocol );

// 返回类实现的协议列表
Protocol * class_copyProtocolList ( Class cls, unsigned int *outCount );
测试协议
@protocol PeopleProcol <NSObject>
@end

- (void)testProtocol {
    // 添加协议
    Protocol *p = @protocol(PeopleProcol);
    if (class_addProtocol([People class], p)) {
        NSLog(@"Add Protoclol Success");
    }else{
        NSLog(@"Add protocol Fail");
    }
    if (class_conformsToProtocol([People class], p)) {
        NSLog(@"实现了 PeopleProcol 协议");
    }else{
        NSLog(@"没有实现 PeopleProcol 协议");
    }
    unsigned int outCount;
    Protocol *__unsafe_unretained *protocolList = class_copyProtocolList([People class], &outCount);
    for (unsigned int i = 0; i < outCount; i++) {
        Protocol *p = protocolList[i];
        const char *protocolName = protocol_getName(p);
        NSLog(@"协议名称: %s",protocolName);
    }
}
运行结果
2018-05-01 17:29:12.580433+0800 RuntimeDemo[25007:940310] Add Protoclol Success
2018-05-01 17:29:12.580591+0800 RuntimeDemo[25007:940310] 实现了 PeopleProcol 协议
2018-05-01 17:29:12.580707+0800 RuntimeDemo[25007:940310] 协议名称: PeopleProcol
3.2.4 版本号
- (void)testVersion {
    int version = class_getVersion([People class]);
    NSLog(@"version %d",version);

    class_setVersion([People class], 10086);

    int nerVersion = class_getVersion([People class]);
    NSLog(@"nerVersion %d",nerVersion);
}
运行结果
2018-05-01 17:38:29.593821+0800 RuntimeDemo[25266:956588] version 0
2018-05-01 17:38:29.593972+0800 RuntimeDemo[25266:956588] nerVersion 10086
3.3 动态创建类和对象
3.3.1. 动态创建类
// 创建一个新类和元类
Class objc_allocateClassPair (Class superclass, const char *name, size_t extraBytes);

// 销魂一个类及其相关联的类
void objc_disposeClassPair (Class cls);

// 在应用中注册由objc_allocateClassPair创建类
void objc_registerClassPair (Class cls);
其中:
(1)objc_allocateClassPair函数:如果我们要创建一个根类,则superclass指定为Nil。extraBytes通常指定为0,该参数是分配给类和元类对象尾部的索引ivars的字节数。
(2)为了创建一个新类,我们需要调用objc_allocateClassPair。然后使用诸如class_addMethod,class_addIvar等函数来为新创建的类添加方法、实例变量和属性等。完成这些后,我们需要调用objc_registerClassPair函数来注册类,之后这个新类就可以在程序中使用了。
(3)实例方法和实例变量应该添加到类自身上,而类方法应该添加到类的元类上。
(4)objc_disposeClassPair只能销毁由objc_allocateClassPair创建的类,当有实例存在或者它的子类存在时,调用这个函数会抛出异常。
测试代码:
- (void)testAddClass {
    Class TestClass = objc_allocateClassPair([NSObject class], "myClass", 0);
    if (class_addIvar(TestClass, "myIvar", sizeof(NSString *), sizeof(NSString *), "@")) {
        NSLog(@"Add Ivar Success");
    }
    class_addMethod(TestClass, @selector(method1:), (IMP)method0, "v@:");
    // 注册这个类到runtime才可使用
    objc_registerClassPair(TestClass);

    // 生成一个实例化对象
    id myObjc = [[TestClass alloc] init];
    NSString *str = @"qiuxuewei";
    //给刚刚添加的变量赋值
    //object_setInstanceVariable(myobj, "myIvar", (void *)&str);在ARC下不允许使用
    [myObjc setValue:str forKey:@"myIvar"];
    [myObjc method1:10086];
}
- (void)method1:(int)a {
}
void method0(id self, SEL _cmd, int a) {
    Ivar v = class_getInstanceVariable([self class], "myIvar");
    id o = object_getIvar(self, v);
    NSLog(@"%@ \n int a is %d", o,a);
}
运行结果:
2018-05-01 22:30:30.159096+0800 RuntimeDemo[31292:1162987] Add Ivar Success
2018-05-01 22:30:30.159344+0800 RuntimeDemo[31292:1162987] qiuxuewei
 int a is 10086
3.3.2. 动态创建对象
// 创建类的实例
id class_createInstance (Class cls, size_t extraBytes);

// 在指定位置创建类实例
id objc_constructInstance (Class cls, void *bytes);

// 销毁类实例
void * objc_destructInstance (id obj);
class_createInstance函数:创建实例时,会在默认的内存区域为类分配内存。extraBytes参数表示分配的额外字节数。这些额外的字节可用于存储在类定义中所定义的实例变量之外的实例变量。该函数在ARC环境下无法使用。
调用class_createInstance的效果与+alloc方法类似。不过在使用class_createInstance时,我们需要确切的知道我们要用它来做什么。
测试代码
- (void)testCreteInstance {
    id testInstance = class_createInstance([NSString class], sizeof(unsigned));
    id str1 = [testInstance init];
    NSLog(@"%@",[str1 class]);
    id str2 = [[NSString alloc] initWithString: @"Test"];
    NSLog(@"%@",[str2 class]);
}
运行结果:
2018-05-01 23:43:25.941205+0800 RuntimeDemo[32783:1223167] NSString
2018-05-01 23:43:25.941364+0800 RuntimeDemo[32783:1223167] __NSCFConstantString
3.3.3. 其他类和对象相关的操作函数
类
// 获取已注册的类定义的列表
int objc_getClassList(Class *buffer, int bufferCount);

// 创建并返回一个指向所有已注册类的指针列表
Class * objc_copyClassList (unsigned int * outCount);

// 返回指定类的类定义
Class objc_lookUpClass ( const char *name );
Class objc_getClass ( const char *name );
Class objc_getRequiredClass ( const char *name );

// 返回指定类的元类
Class objc_getMetaClass ( const char *name );
对象
// 返回指定对象的一份拷贝
id object_copy ( id obj, size_t size );

// 释放指定对象占用的内存
id object_dispose ( id obj );

// 修改类实例的实例变量的值
Ivar object_setInstanceVariable ( id obj, const char *name, void *value );

// 获取对象实例变量的值
Ivar object_getInstanceVariable ( id obj, const char *name, void **outValue );

// 返回指向给定对象分配的任何额外字节的指针
void * object_getIndexedIvars ( id obj );

// 返回对象中实例变量的值
id object_getIvar ( id obj, Ivar ivar );

// 设置对象中实例变量的值
void object_setIvar ( id obj, Ivar ivar, id value );

// 返回给定对象的类名
const char * object_getClassName ( id obj );

// 返回对象的类
Class object_getClass ( id obj );

// 设置对象的类
Class object_setClass ( id obj, Class cls );
获取类的定义
// 获取已注册的类定义的列表
int objc_getClassList (Class *)
3.3.4. 应用实例
1. Json 转 Model
操作函数
- (instancetype)initWithDict:(NSDictionary *)dict {
    if (self = [self init]) {
        NSMutableArray <NSString *>*keys = [NSMutableArray array];
        NSMutableArray <NSString *>*attributes = [NSMutableArray array];

        unsigned int outCount;
        objc_property_t * propertyList = class_copyPropertyList([self class], &outCount);
        for (unsigned int i = 0; i < outCount; i++) {
            objc_property_t property = propertyList[i];
            const char *name = property_getName(property);
            NSString *propertyName = [NSString stringWithCString:name encoding:NSUTF8StringEncoding];
            [keys addObject:propertyName];

            const char *attribute = property_getAttributes(property);
            NSString *attributeName = [NSString stringWithCString:attribute encoding:NSUTF8StringEncoding];
            [attributes addObject:attributeName];
        }
        free(propertyList);
        for (NSString *key in keys) {
            if ([dict valueForKey:key]) {
                [self setValue:[dict valueForKey:key] forKey:key];
            }
        }
    }
    return self;
}
2. 快速归解档
遵循 NSCoding 协议
// 归档
- (instancetype)initWithCoder:(NSCoder *)aDecoder {
    if (self = [super init]) {
        unsigned int outCount;
        Ivar * ivarList = class_copyIvarList([self class], &outCount);
        for (unsigned int i = 0; i < outCount; i++) {
            Ivar ivar = ivarList[i];
            NSString *key = [NSString stringWithCString:ivar_getName(ivar) encoding:NSUTF8StringEncoding];
            [self setValue:[aDecoder decodeObjectForKey:key] forKey:key];
        }
    }
    return self;
}
// 解档
- (void)encodeWithCoder:(NSCoder *)aCoder {
    unsigned int outCount;
    Ivar * ivarList = class_copyIvarList([self class], &outCount);
    for (unsigned int i = 0; i < outCount; i++) {
        Ivar ivar = ivarList[i];
        NSString *key = [NSString stringWithCString:ivar_getName(ivar) encoding:NSUTF8StringEncoding];
        [aCoder encodeObject:[self valueForKey:key] forKey:key];
    }
}
测试
- (void)testCoder {
    NSString *key = @"peopleKey";
    People * people = [[People alloc] init];
    people.name = @"邱学伟";
    people.age = @18;
    NSData *peopleData = [NSKeyedArchiver archivedDataWithRootObject:people];
    [[NSUserDefaults standardUserDefaults] setObject:peopleData forKey:key];

    NSData *testData = [[NSUserDefaults standardUserDefaults] objectForKey:key];
    People *testPeople = [NSKeyedUnarchiver unarchiveObjectWithData:testData];
    NSLog(@"%@",testPeople.name);
}
3. 关联对象
// 关联对象
void objc_setAssociatedObject (id object, const void * key, id value, objc_AssociationPolicy policy);

// 获取关联的对象
id objc_getAssociatedObject (id object, const void * key);

// 移除关联的对象
void objc_removeAssociatedObjects (id object);
参数说明
id object : 被关联的对象
const void *key : 关联的key, set和get 需统一
id value : 关联的对象
objc_AssociationPolicy policy : 内存管理的策略
objc_AssociationPolicy policy的enum值有:、
typedef OBJC_ENUM(uintptr_t, objc_AssociationPolicy) {

    OBJC_ASSOCIATION_ASSIGN = 0,           /**< Specifies a weak reference to the associated object. */

    OBJC_ASSOCIATION_RETAIN_NONATOMIC = 1, /**< Specifies a strong reference to the associated object.
                                            *   The association is not made atomically. */

    OBJC_ASSOCIATION_COPY_NONATOMIC = 3,   /**< Specifies that the associated object is copied.
                                            *   The association is not made atomically. */

    OBJC_ASSOCIATION_RETAIN = 01401,       /**< Specifies a strong reference to the associated object.
                                            *   The association is made atomically. */

    OBJC_ASSOCIATION_COPY = 01403          /**< Specifies that the associated object is copied.
                                            *   The association is made atomically. */

};
应用实例
//
//  People+Category.h
//  RuntimeDemo
//
//  Created by 邱学伟 on 2018/5/3.
//  Copyright © 2018年 邱学伟. All rights reserved.
//

#import "People.h"
@interface People (Category)
/**
 新增属性
 */
@property (nonatomic, copy) NSString *blog;
@end
//
//  People+Category.m
//  RuntimeDemo
//
//  Created by 邱学伟 on 2018/5/3.
//  Copyright © 2018年 邱学伟. All rights reserved.
//

#import "People+Category.h"
#import <objc/runtime.h>
@implementation People (Category)
static const char * cPeopleBlogKey = "cPeopleBlogKey";
- (NSString *)blog {
    return objc_getAssociatedObject(self, cPeopleBlogKey);
}
- (void)setBlog:(NSString *)blog {
    objc_setAssociatedObject(self, cPeopleBlogKey, blog, OBJC_ASSOCIATION_COPY);
}
@end
4. 方法与消息
4.1 SEL
SEL 又叫方法选择器, 是表示一个方法的selector的指针,其定义如下
typedef struct objc_selector *SEL;
方法的selector用于表示运行时方法的名字,Objective-C在编译时,会根据每一个方法的名字,参数序列,生成一个唯一的整型标示(Int类型的地址),这个标识就是SEL. 如下
+ (void)load {
    SEL sel = @selector(testMethod);
    NSLog(@"Programmer sel = %p",sel);
}
- (void)testMethod {
    NSLog(@"testMethod");
}
两个类之间,不管它们是父类与子类的关系,还是之间没有这种关系,只要方法名相同,那么方法的SEL就是一样的。每一个方法都对应着一个SEL。所以在Objective-C同一个类(及类的继承体系)中,不能存在2个同名的方法,即使参数类型不同也不行。相同的方法只能对应一个SEL。这也就导致Objective-C在处理相同方法名且参数个数相同但类型不同的方法方面的能力很差.
当然,不同的类可以拥有相同的selector,这个没有问题。不同类的实例对象执行相同的selector时,会在各自的方法列表中去根据selector去寻找自己对应的IMP。
本质上,SEL只是一个指向方法的指针(准确的说,只是一个根据方法名hash化了的KEY值,能唯一代表一个方法),它的存在只是为了加快方法的查询速度。这个查找过程我们将在下面讨论。
我们可以在运行时添加新的selector,也可以在运行时获取已存在的selector,我们可以通过下面三种方法来获取SEL:
(1)sel_registerName函数
(2)Objective-C编译器提供的@selector()
(3)NSSelectorFromString()方法
4.2 IMP
IMP 是一个函数指针,指向方法实现的首地址。
id (*IMP)(id,SEL,...)
这个函数使用当前CPU架构实现的标准的C调用约定。第一个参数是指向self的指针(如果是实例方法,则是类实例的内存地址;如果是类方法,则是指向元类的指针),第二个参数是方法选择器(selector),接下来是方法的实际参数列表。
前面介绍过的SEL就是为了查找方法的最终实现IMP的。由于每个方法对应唯一的SEL,因此我们可以通过SEL方便快速准确地获得它所对应的IMP,查找过程将在下面讨论。取得IMP后,我们就获得了执行这个方法代码的入口点,此时,我们就可以像调用普通的C语言函数一样来使用这个函数指针了。
通过取得IMP,我们可以跳过Runtime的消息传递机制,直接执行IMP指向的函数实现,这样省去了Runtime消息传递过程中所做的一系列查找操作,会比直接向对象发送消息高效一些。
4.3 Method
Method 用于表示类定义中的方法,定义如下:
typedef struct objc_method *Method;

struct objc_method {
     SEL method_name OBJC2_UNAVAILABLE; // 方法名
     char *method_types OBJC2_UNAVAILABLE; //是个char指针,存储着方法的参数类型和返回值类型
     IMP method_imp OBJC2_UNAVAILABLE; // 方法实现,函数指针
}
该结构体中包含一个SEL和IMP,实际上相当于在SEL和IMP之间作了一个映射。有了SEL,我们便可以找到对应的IMP,从而调用方法的实现代码。
4.4 objc_method_description
objc_method_description定义了一个Objective-C方法,其定义如下:
struct objc_method_description { SEL name; char *types; };
4.5 Method 相关操作函数
 // 调用指定方法的实现
    id method_invoke (id receiver, Method m, ...);

    // 调用返回一个数据结构的方法的实现
    void method_invoke_stret (id receiver, Method m, ...);

    // 获取方法名
    SEL method_getName (Method m);

    // 获取方法的实现
    IMP method_getImplementation (Method m);

    // 获取描述方法参数和返回值类型的字符串
    const char * method_getTypeEncoding (Method m);

    // 获取方法的返回值类型的字符串
    char * method_copyReturnType ( Method m );

    // 获取方法的指定位置参数的类型字符串
    char * method_copyArgumentType ( Method m, unsigned int index );

    // 通过引用返回方法的返回值类型字符串
    void method_getReturnType ( Method m, char *dst, size_t dst_len );

    // 返回方法的参数的个数
    unsigned int method_getNumberOfArguments ( Method m );

    // 通过引用返回方法指定位置参数的类型字符串
    void method_getArgumentType ( Method m, unsigned int index, char *dst, size_t dst_len );

    // 返回指定方法的方法描述结构体
    struct objc_method_description * method_getDescription ( Method m );

    // 设置方法的实现
    IMP method_setImplementation ( Method m, IMP imp );

    // 交换两个方法的实现
    void method_exchangeImplementations ( Method m1, Method m2 );
(1)method_invoke函数,返回的是实际实现的返回值。参数receiver不能为空。这个方法的效率会比method_getImplementation和method_getName更快。
(2)method_getName函数,返回的是一个SEL。如果想获取方法名的C字符串,可以使用sel_getName(method_getName(method))。
(3)method_getReturnType函数,类型字符串会被拷贝到dst中。
(4)method_setImplementation函数,注意该函数返回值是方法之前的实现。
4.6 方法选择器
// 返回给定选择器指定的方法的名称
const char * sel_getName ( SEL sel );

// 在Objective-C Runtime系统中注册一个方法,将方法名映射到一个选择器,并返回这个选择器
SEL sel_registerName ( const char *str );

// 在Objective-C Runtime系统中注册一个方法
SEL sel_getUid ( const char *str );

// 比较两个选择器
BOOL sel_isEqual ( SEL lhs, SEL rhs );
sel_registerName函数:在我们将一个方法添加到类定义时,我们必须在Objective-C Runtime系统中注册一个方法名以获取方法的选择器。
4.7 方法调用流程
1. 消息发送
在Objective-C中,消息直到运行时才绑定到方法实现上。编译器会将消息表达式[receiver message]转化为一个消息函数的调用,即objc_msgSend。这个函数将消息接收者和方法名作为其基础参数,如以下所示:
objc_msgSend(receiver, selector)
如果消息中还有其他参数,则该方法的形式如下所示:
objc_msgSend(receiver, selector,arg1, arg2, ...);
这个函数完成了动态绑定的所有事情:
(1)首先它找到selector对应的方法实现。因为同一个方法可能在不同的类中有不同的实现,所以我们需要依赖于接收者的类来找到的确切的实现。
(2)它调用方法实现,并将接收者对象及方法的所有参数传给它。
(3)最后,它将实现返回的值作为它自己的返回值。
消息的关键在于结构体 objc_class, 这个结构体有两个字段是我们在分发消息的时候关注的:
- 指向父类的指针。
- 一个类的方法分发表,即methodLists
当我们创建一个新对象时,先为其分配内存,并初始化其成员变量。其中isa指针也会被初始化,让对象可以访问类及类的继承体系。
下图演示了这样一个消息的基本框架:
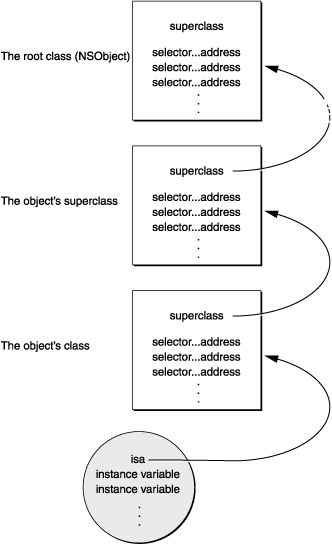
当消息发送给一个对象时,objc_msgSend通过对象的isa指针获取到类的结构体,然后在方法分发表里面查找方法的selector。如果没有找到selector,则通过objc_msgSend结构体中的指向父类的指针找到其父类,并在父类的分发表里面查找方法的selector。依此,会一直沿着类的继承体系到达NSObject类。一旦定位到selector,函数会就获取到了实现的入口点,并传入相应的参数来执行方法的具体实现。如果最后没有定位到selector,则会走消息转发流程
2. 隐藏参数
objc_msgSend 有两个隐藏参数
- 消息接收对象
- 方法的selector
这两个参数为方法的实现提供了调用者的信息。之所以说是隐藏的,是因为他们在定义方法的源代码中没有声明。他们是在编译时被插入实现代码的。
虽然这些参数没有显示声明,但在代码中仍然可以引用它们。我们可以使用self来引用接收者对象,使用_cmd 来引用选择器。如下代码:
- strange
{
    id  target = getTheReceiver();
    SEL method = getTheMethod();
    if ( target == self || method == _cmd )
        return nil;
    return [target performSelector:method];
}
当然,这两个参数我们用的比较多的是self,_cmd 在实际中用得比较少。
3. 获取方法地址
Runtime中方法的动态绑定让我们写代码时更具灵活性,如我们可以把消息转发给我们想要的对象,或者随意交换一个方法的实现等。不过灵活性的提升也带来了性能上的一些损耗。毕竟我们需要去查找方法的实现,而不像函数调用来得那么直接。当然,方法的缓存一定程度上解决了这一问题。
我们上面提到过,如果想要避开这种动态绑定方式,我们可以获取方法实现的地址,然后像调用函数一样来直接调用它。特别是当我们需要在一个循环内频繁地调用一个特定的方法时,通过这种方式可以提高程序的性能。
NSObject类提供了methodForSelector:方法,让我们可以获取到方法的指针,然后通过这个指针来调用实现代码。我们需要将methodForSelector:返回的指针转换为合适的函数类型,函数参数和返回值都需要匹配上。
这里需要注意的就是函数指针的前两个参数必须是id和SEL。
当然这种方式只适合于在类似于for循环这种情况下频繁调用同一方法,以提高性能的情况。另外,methodForSelector:是由Cocoa运行时提供的;它不是Objective-C语言的特性。
- (void)testCommonMethod {
    for (int i = 0; i < 10000; i++) {
        [self logMethod:i];
    }
    //执行时长: Test Case '-[RuntimeDemoTests testCommonMethod]' passed (2.311 seconds).
}

- (void)testRuntimeMethod {
    void(*logM)(id, SEL, int);
    IMP imp = [self methodForSelector:@selector(logMethod:)];
    logM = (void(*)(id, SEL, int))imp;
    for (int i = 0; i < 10000; i++) {
        logM(self, @selector(logMethod:), i);
    }
    //执行时长: Test Case '-[RuntimeDemoTests testRuntimeMethod]' passed (2.199 seconds).
}
4. 消息转发
当一个对象能接收一个消息时,就会走正常的方法调用流程。但如果一个对象无法接收指定消息时,又会发生什么事呢?默认情况下,如果是以[object message]的方式调用方法,如果object无法响应message消息时,编译器会报错。但如果是以perform…的形式来调用,则需要等到运行时才能确定object是否能接收message消息。如果不能,则程序崩溃。
通常,当我们不能确定一个对象是否能接收某个消息时,会先调用respondsToSelector:来判断一下。如下代码所示:
// perform方法要求传入参数必须是对象,如果方法本身的参数是int,直接传NSNumber会导致得到的int参数不正确
if ([self respondsToSelector:@selector(logMethod:)]) {
        [self performSelector:@selector(logMethod:) withObject:[NSNumber numberWithInt:10086]];
    }
当一个对象无法接收某一消息时,就会启动所谓”消息转发(message forwarding)“机制,通过这一机制,我们可以告诉对象如何处理未知的消息。默认情况下,对象接收到未知的消息,会导致程序崩溃,通过控制台,我们可以看到以下异常信息:
unrecognized selector sent to instance 0x100111940
这段异常信息实际上是由NSObject的”doesNotRecognizeSelector”方法抛出的。不过,我们可以采取一些措施,让我们的程序执行特定的逻辑,而避免程序的崩溃。
消息转发机制基本上分为三个步骤:
(1)动态方法解析
(2)备用接收者
(3)完整转发
1. 动态方法解析
对象在接收到未知的消息时,首先会调用所属类的类方法+resolveInstanceMethod:(实例方法)或者+resolveClassMethod:(类方法)。在这个方法中,我们有机会为该未知消息新增一个”处理方法”“。不过使用该方法的前提是我们已经实现了该”处理方法”,只需要在运行时通过class_addMethod函数动态添加到类里面就可以了。如下代码所示:
void functionForMethod (id self, SEL _cmd) {
    NSLog(@"functionForMethod");
}
/// 调用未实现对象方法
+ (BOOL)resolveInstanceMethod:(SEL)sel {
    NSString *selName = NSStringFromSelector(sel);
    if ([selName isEqualToString:@"methodNull"]) {
        class_addMethod(self.class, sel, (IMP)functionForMethod, "v@:");
        return YES;
    }
    return [super resolveClassMethod:sel];
}
/// 调用未实现类方法
+ (BOOL)resolveClassMethod:(SEL)sel {
    NSString *selName = NSStringFromSelector(sel);
    if ([selName isEqualToString:@"methodNull"]) {
        //v@:表示返回值和参数,可以在苹果官网查看Type Encoding相关文档 https://developer.apple.com/library/mac/DOCUMENTATION/Cocoa/Conceptual/ObjCRuntimeGuide/Articles/ocrtTypeEncodings.html
        class_addMethod(self.class, sel, (IMP)functionForMethod, "v@:");
        return YES;
    }
    return [super resolveClassMethod:sel];
}
2. 备用接受者
如果在上一步无法处理消息,则Runtime会继续调以下方法:
- (id)forwardingTargetForSelector:(SEL)aSelector
如果一个对象实现了这个方法,并返回一个非nil的结果,则这个对象会作为消息的新接收者,且消息会被分发到这个对象。当然这个对象不能是self自身,否则就是出现无限循环。当然,如果我们没有指定相应的对象来处理aSelector,则应该调用父类的实现来返回结果。
使用这个方法通常是在对象内部,可能还有一系列其它对象能处理该消息,我们便可借这些对象来处理消息并返回,这样在对象外部看来,还是由该对象亲自处理了这一消息。如下代码所示:
//
//  People.m
//  RuntimeDemo
//
//  Created by 邱学伟 on 2018/4/27.
//  Copyright © 2018年 邱学伟. All rights reserved.
//

#import "People.h"
#import <objc/runtime.h>

@interface XWPeople : NSObject
- (void)people2log;
@end
@implementation XWPeople
- (void)people2log {
    NSLog(@"people2log");
}
@end

@interface People () <NSCoding> {
}
@property (nonatomic, strong) XWPeople *xw_people;
@end
@implementation People

//// 1 级处理
void functionForMethod (id self, SEL _cmd) {
    NSLog(@"functionForMethod");
}
/// 调用未实现对象方法
+ (BOOL)resolveInstanceMethod:(SEL)sel {
    NSString *selName = NSStringFromSelector(sel);
    if ([selName isEqualToString:@"methodNull"]) {
        class_addMethod(self.class, sel, (IMP)functionForMethod, "v@:");
        return YES;
    }
    return [super resolveClassMethod:sel];
}
/// 调用未实现类方法
+ (BOOL)resolveClassMethod:(SEL)sel {
    NSString *selName = NSStringFromSelector(sel);
    if ([selName isEqualToString:@"methodNull"]) {
        //v@:表示返回值和参数,可以在苹果官网查看Type Encoding相关文档 https://developer.apple.com/library/mac/DOCUMENTATION/Cocoa/Conceptual/ObjCRuntimeGuide/Articles/ocrtTypeEncodings.html
        class_addMethod(self.class, sel, (IMP)functionForMethod, "v@:");
        return YES;
    }
    return [super resolveClassMethod:sel];
}

/// 2 级处理
- (id)forwardingTargetForSelector:(SEL)aSelector {
    NSString *selName = NSStringFromSelector(aSelector);
    if ([selName isEqualToString:@"people2log"]) {
        return self.xw_people;
    }
    return [super forwardingTargetForSelector:aSelector];
}
- (XWPeople *)xw_people {
    if(!_xw_people){
        _xw_people = [[XWPeople alloc] init];
    }
    return _xw_people;
}
@end
这一步合适于我们只想将消息转发到另一个能处理该消息的对象上。但这一步无法对消息进行处理,如操作消息的参数和返回值。
3. 完整转发
如果在上一步还不能处理未知消息,则唯一能做的就是启用完整的消息转发机制了。此时会调用以下方法:
- (void)forwardInvocation:(NSInvocation *)anInvocation
运行时系统会在这一步给消息接收者最后一次机会将消息转发给其它对象。对象会创建一个表示消息的NSInvocation对象,把与尚未处理的消息有关的全部细节都封装在anInvocation中,包括selector,目标(target)和参数。我们可以在forwardInvocation方法中选择将消息转发给其它对象。
forwardInvocation:方法的实现有两个任务:
(1)定位可以响应封装在anInvocation中的消息的对象。这个对象不需要能处理所有未知消息。
(2)使用anInvocation作为参数,将消息发送到选中的对象。anInvocation将会保留调用结果,运行时系统会提取这一结果并将其发送到消息的原始发送者。
不过,在这个方法中我们可以实现一些更复杂的功能,我们可以对消息的内容进行修改,比如追回一个参数等,然后再去触发消息。另外,若发现某个消息不应由本类处理,则应调用父类的同名方法,以便继承体系中的每个类都有机会处理此调用请求。
还有一个很重要的问题,我们必须重写以下方法:
- (NSMethodSignature *)methodSignatureForSelector:(SEL)aSelector
消息转发机制使用从这个方法中获取的信息来创建NSInvocation对象。因此我们必须重写这个方法,为给定的selector提供一个合适的方法签名。
完整的示例如下所示:
//
//  People.m
//  RuntimeDemo
//
//  Created by 邱学伟 on 2018/4/27.
//  Copyright © 2018年 邱学伟. All rights reserved.
//

#import "People.h"
#import <objc/runtime.h>

@interface XWPeople : NSObject
- (void)people2log;
- (void)people3log;
@end
@implementation XWPeople
- (void)people2log {
    NSLog(@"people2log");
}

- (void)people3log {
    NSLog(@"people3log");
}
@end

@interface People () <NSCoding> {
}
@property (nonatomic, strong) XWPeople *xw_people;
@end
@implementation People

//// 1 级处理
void functionForMethod (id self, SEL _cmd) {
    NSLog(@"functionForMethod");
}
/// 调用未实现对象方法
+ (BOOL)resolveInstanceMethod:(SEL)sel {
    NSString *selName = NSStringFromSelector(sel);
    if ([selName isEqualToString:@"methodNull"]) {
        class_addMethod(self.class, sel, (IMP)functionForMethod, "v@:");
        return YES;
    }
    return [super resolveClassMethod:sel];
}
/// 调用未实现类方法
+ (BOOL)resolveClassMethod:(SEL)sel {
    NSString *selName = NSStringFromSelector(sel);
    if ([selName isEqualToString:@"methodNull"]) {
        //v@:表示返回值和参数,可以在苹果官网查看Type Encoding相关文档 https://developer.apple.com/library/mac/DOCUMENTATION/Cocoa/Conceptual/ObjCRuntimeGuide/Articles/ocrtTypeEncodings.html
        class_addMethod(self.class, sel, (IMP)functionForMethod, "v@:");
        return YES;
    }
    return [super resolveClassMethod:sel];
}

/// 2 级处理
- (id)forwardingTargetForSelector:(SEL)aSelector {
    NSString *selName = NSStringFromSelector(aSelector);
    if ([selName isEqualToString:@"people2log"]) {
        return self.xw_people;
    }
    return [super forwardingTargetForSelector:aSelector];
}
- (XWPeople *)xw_people {
    if(!_xw_people){
        _xw_people = [[XWPeople alloc] init];
    }
    return _xw_people;
}

/// 3 级处理
- (NSMethodSignature *)methodSignatureForSelector:(SEL)aSelector {
    NSMethodSignature *signature = [super methodSignatureForSelector:aSelector];
    if (!signature) {
        if ([XWPeople instancesRespondToSelector:aSelector]) {
            signature = [XWPeople instanceMethodSignatureForSelector:aSelector];
        }
    }
    return signature;
}
- (void)forwardInvocation:(NSInvocation *)anInvocation {
    if ([XWPeople instancesRespondToSelector:anInvocation.selector]) {
        [anInvocation invokeWithTarget:self.xw_people];
    }
}

@end
NSObject的forwardInvocation:方法实现只是简单调用了doesNotRecognizeSelector:方法,它不会转发任何消息。这样,如果不在以上所述的三个步骤中处理未知消息,则会引发一个异常。
从某种意义上来讲,forwardInvocation:就像一个未知消息的分发中心,将这些未知的消息转发给其它对象。或者也可以像一个运输站一样将所有未知消息都发送给同一个接收对象。这取决于具体的实现。
4、消息转发与多重继承
回过头来看第二和第三步,通过这两个方法我们可以允许一个对象与其它对象建立关系,以处理某些未知消息,而表面上看仍然是该对象在处理消息。通过这种关系,我们可以模拟“多重继承”的某些特性,让对象可以“继承”其它对象的特性来处理一些事情。不过,这两者间有一个重要的区别:多重继承将不同的功能集成到一个对象中,它会让对象变得过大,涉及的东西过多;而消息转发将功能分解到独立的小的对象中,并通过某种方式将这些对象连接起来,并做相应的消息转发。
不过消息转发虽然类似于继承,但NSObject的一些方法还是能区分两者。如respondsToSelector:和isKindOfClass:只能用于继承体系,而不能用于转发链。便如果我们想让这种消息转发看起来像是继承,则可以重写这些方法,如以下代码所示:
- (BOOL)respondsToSelector:(SEL)aSelector   {
       if ( [super respondsToSelector:aSelector] )
       		return YES;
       else {
       		/* Here, test whether the aSelector message can     *
      		 * be forwarded to another object and whether that  *
      		* object can respond to it. Return YES if it can.  */
       }
      return NO;
}
4.6 Method Swizzling
4.6.1 概述
Objective-C 中的 Method Swizzling 是一项异常强大的技术,它可以允许我们动态地替换方法的实现,实现 Hook 功能,是一种比子类化更加灵活的“重写”方法的方式。
4.6.2 原理
Objective-C同一个类(及类的继承体系)中,不能存在2个同名的方法,即使参数类型不同也不行。所以下面两个方法在 runtime 看来就是同一个方法:
- (void)viewWillAppear:(BOOL)animated;
- (void)viewWillAppear:(NSString *)string;
而下面两个方法却是可以共存的
- (void)viewWillAppear:(BOOL)animated;
+ (void)viewWillAppear:(BOOL)animated;
因为实例方法和类方法是分别保存在类对象和元类对象中的。
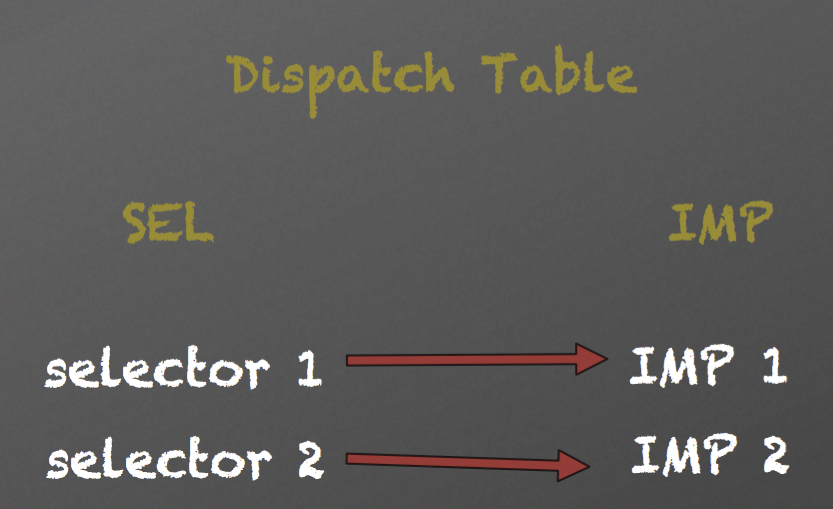
原则上,方法的名称 name 和方法的实现 imp 是一一对应的,而 Method Swizzling 的原理就是动态地改变它们的对应关系,以达到替换方法实现的目的
原有方法和实现的对应关系如下图:
通过runtime可实现:
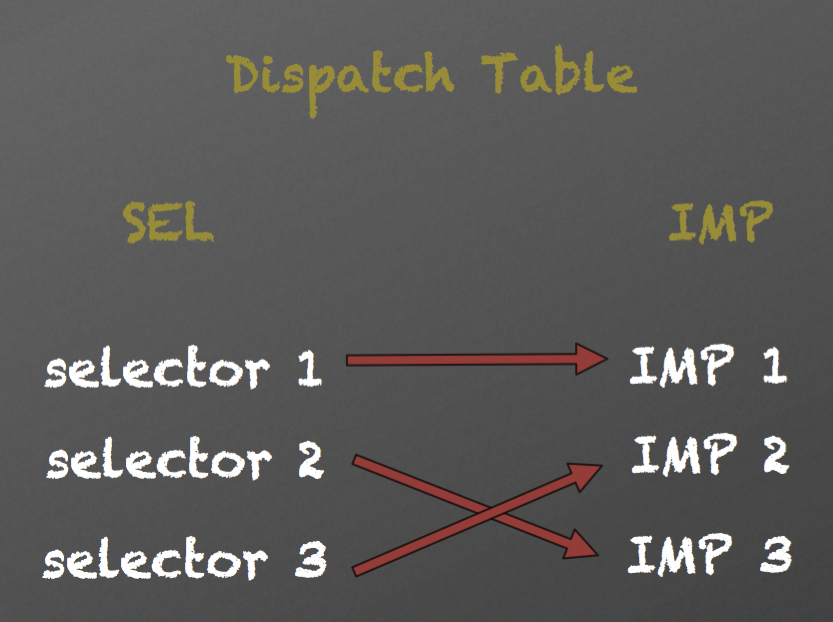
在OC语言的runtime特性中,调用一个对象的方法就是给这个对象发送消息。是通过查找接收消息对象的方法列表,从方法列表中查找对应的SEL,这个SEL对应着一个IMP(一个IMP可以对应多个SEL),通过这个IMP找到对应的方法调用。
在每个类中都有一个Dispatch Table,这个Dispatch Table本质是将类中的SEL和IMP(可以理解为函数指针)进行对应。而我们的Method Swizzling就是对这个table进行了操作,让SEL对应另一个IMP。
4.6.3 使用注意
- Swizzling应该总在+load中执行:Objective-C在运行时会自动调用类的两个方法+load和+initialize。+load会在类初始加载时调用,和+initialize比较+load能保证在类的初始化过程中被加载
- Swizzling应该总是在dispatch_once中执行:swizzling会改变全局状态,所以在运行时采取一些预防措施,使用dispatch_once就能够确保代码不管有多少线程都只被执行一次。这将成为method swizzling的最佳实践。
- Selector,Method和Implementation:这几个之间关系可以这样理解,一个类维护一个运行时可接收的消息分发表,分发表中每个入口是一个Method,其中key是一个特定的名称,及SEL,与其对应的实现是IMP即指向底层C函数的指针。
4.6.4 应用实例
1. 替换方法实现
//  ViewController+Method.m
//  RuntimeDemo
//
//  Created by 邱学伟 on 2018/5/4.
//  Copyright © 2018年 邱学伟. All rights reserved.
//

#import "ViewController+Method.h"
#import <objc/runtime.h>

@implementation ViewController (Method)
+ (void)load {
    [super load];
    [self exchangeMethod];
}

/// runtime 交换方法
+ (void)exchangeMethod {
    static dispatch_once_t onceToken;
    dispatch_once(&onceToken, ^{
        Class class = [self class];

        SEL originSel = @selector(viewWillAppear:);
        SEL swizzledSel = @selector(xw_viewWillAppear:);

        Method originMethod = class_getInstanceMethod(class, originSel);
        Method swizzledMethod = class_getInstanceMethod(class, swizzledSel);

        //先尝试給源方法添加实现,这里是为了避免源方法没有实现的情况
        BOOL isAddMethod = class_addMethod(class, originSel, method_getImplementation(swizzledMethod), method_getTypeEncoding(swizzledMethod));
        if (isAddMethod) {
            class_replaceMethod(class, swizzledSel, method_getImplementation(originMethod), method_getTypeEncoding(originMethod));
        }else{
            method_exchangeImplementations(originMethod, swizzledMethod);
        }
    });
}
- (void)xw_viewWillAppear:(BOOL)animation {
    [self xw_viewWillAppear:animation];
    NSLog(@"xw_viewWillAppear - %@",self);
}
@end
2、Method Swizzling类簇
在我们项目开发过程中,经常因为NSArray数组越界或者NSDictionary的key或者value值为nil等问题导致的崩溃,我们可以尝试使用前面知识对NSArray、NSMutableArray、NSDictionary、NSMutableDictionary等类进行Method Swizzling,但是结果发现Method Swizzling根本就不起作用,到底为什么呢?
这是因为Method Swizzling对NSArray这些的类簇是不起作用的。因为这些类簇类,其实是一种抽象工厂的设计模式。抽象工厂内部有很多其它继承自当前类的子类,抽象工厂类会根据不同情况,创建不同的抽象对象来进行使用。例如我们调用NSArray的objectAtIndex:方法,这个类会在方法内部判断,内部创建不同抽象类进行操作。
所以也就是我们对NSArray类进行操作其实只是对父类进行了操作,在NSArray内部会创建其他子类来执行操作,真正执行操作的并不是NSArray自身,所以我们应该对其“真身”进行操作。
下面我们实现了防止NSArray因为调用objectAtIndex:方法,取下标时数组越界导致的崩溃:
#import "NSArray+ MyArray.h"
#import "objc/runtime.h"
@implementation NSArray MyArray)
+ (void)load {
    Method fromMethod = class_getInstanceMethod(objc_getClass("__NSArrayI"), @selector(objectAtIndex:));
    Method toMethod = class_getInstanceMethod(objc_getClass("__NSArrayI"), @selector(my_objectAtIndex:));
    method_exchangeImplementations(fromMethod, toMethod);
}

- (id)my_objectAtIndex:(NSUInteger)index {
    if (self.count-1 < index) {
        // 这里做一下异常处理,不然都不知道出错了。
        @try {
            return [self my_objectAtIndex:index];
        }
        @catch (NSException *exception) {
            // 在崩溃后会打印崩溃信息,方便我们调试。
            NSLog(@"---------- %s Crash Because Method %s  ----------\n", class_getName(self.class), __func__);
            NSLog(@"%@", [exception callStackSymbols]);
            return nil;
    }
        @finally {}
    } else {
        return [self my_objectAtIndex:index];
    }
}
@end
常见类簇真身:

5. Protocol 和 Category
5.1 Category
指向分类的结构体的指针
typedef struct objc_category *Category;

struct objc_category {
     char *category_name OBJC2_UNAVAILABLE; // 分类名
     char *class_name OBJC2_UNAVAILABLE; // 分类所属的类名
     struct objc_method_list *instance_methods OBJC2_UNAVAILABLE; // 实例方法列表
     struct objc_method_list *class_methods OBJC2_UNAVAILABLE; // 类方法列表,Meta Class方法列表的子集
     struct objc_protocol_list *protocols OBJC2_UNAVAILABLE; // 分类所实现的协议列表
}
示例代码
//
//  main.m
//  RuntimeDemo
//
//  Created by 邱学伟 on 2018/4/27.
//  Copyright © 2018年 邱学伟. All rights reserved.
//

#import <UIKit/UIKit.h>
#import "AppDelegate.h"

@interface NSObject (Fuck)
+ (void)foo;
@end

@implementation NSObject (Fuck)
- (void)foo {
    NSLog(@"我是Foo %@",[self class]);
}
@end

int main(int argc, char * argv[]) {
    @autoreleasepool {

        [NSObject foo];
        [[NSObject new] foo];

        return UIApplicationMain(argc, argv, nil, NSStringFromClass([AppDelegate class]));
    }
}
输出:
2018-05-04 16:23:26.643100+0800 RuntimeDemo[48558:2377362] 我是Foo NSObject
2018-05-04 16:23:26.644354+0800 RuntimeDemo[48558:2377362] 我是Foo NSObject
objc runtime加载后NSObject的Sark Category被加载,头文件+(void)foo没有IMP,只会出现一个warning。被加到Class的Method list里的方法只有-(void)foo,Meta Class的方法列表里没有。
执行[NSObject foo]时,会在Meta Class的Method list里找,找不着就继续往super class里找,NSObject Meta Clas的super class是NSObject本身,这时在NSObject的Method list里就有foo这个方法了,能够正常输出。
执行[[NSObject new] foo]就简单的多了,[NSObject new]生成一个实例,实例的Method list是有foo方法的,于是正常输出。
如果换做其他类就会报错了
5.2 Protocol
Protocol其实就是一个对象结构体
typedef struct objc_object Protocol;
操作函数:
// 返回指定的协议
Protocol * objc_getProtocol ( const char *name );
// 获取运行时所知道的所有协议的数组
Protocol ** objc_copyProtocolList ( unsigned int *outCount );
// 创建新的协议实例
Protocol * objc_allocateProtocol ( const char *name );
// 在运行时中注册新创建的协议
void objc_registerProtocol ( Protocol *proto ); //创建一个新协议后必须使用这个进行注册这个新协议,但是注册后不能够再修改和添加新方法。
// 为协议添加方法
void protocol_addMethodDescription ( Protocol *proto, SEL name, const char *types, BOOL isRequiredMethod, BOOL isInstanceMethod );
// 添加一个已注册的协议到协议中
void protocol_addProtocol ( Protocol *proto, Protocol *addition );
// 为协议添加属性
void protocol_addProperty ( Protocol *proto, const char *name, const objc_property_attribute_t *attributes, unsigned int attributeCount, BOOL isRequiredProperty, BOOL isInstanceProperty );
// 返回协议名
const char * protocol_getName ( Protocol *p );
// 测试两个协议是否相等
BOOL protocol_isEqual ( Protocol *proto, Protocol *other );
// 获取协议中指定条件的方法的方法描述数组
struct objc_method_description * protocol_copyMethodDescriptionList ( Protocol *p, BOOL isRequiredMethod, BOOL isInstanceMethod, unsigned int *outCount );
// 获取协议中指定方法的方法描述
struct objc_method_description protocol_getMethodDescription ( Protocol *p, SEL aSel, BOOL isRequiredMethod, BOOL isInstanceMethod );
// 获取协议中的属性列表
objc_property_t * protocol_copyPropertyList ( Protocol *proto, unsigned int *outCount );
// 获取协议的指定属性
objc_property_t protocol_getProperty ( Protocol *proto, const char *name, BOOL isRequiredProperty, BOOL isInstanceProperty );
// 获取协议采用的协议
Protocol ** protocol_copyProtocolList ( Protocol *proto, unsigned int *outCount );
// 查看协议是否采用了另一个协议
BOOL protocol_conformsToProtocol ( Protocol *proto, Protocol *other );
6. 补充
6.1 Super
在Objective-C中,如果我们需要在类的方法中调用父类的方法时,通常都会用到super,如下所示:
@interface MyViewController: UIViewController
@end
@implementation MyViewController
- (void)viewDidLoad {
    [super viewDidLoad];
    // do something
    ...
}
@end
super与self不同。self是类的一个隐藏参数,每个方法的实现的第一个参数即为self。而super并不是隐藏参数,它实际上只是一个”编译器标示符”,它负责告诉编译器,当调用viewDidLoad方法时,去调用父类的方法,而不是本类中的方法。而它实际上与self指向的是相同的消息接收者。为了理解这一点,我们先来看看super的定义
struct objc_super { id receiver; Class superClass; };
这个结构体有两个成员:
(1)receiver:即消息的实际接收者
(2)superClass:指针当前类的父类
当我们使用super来接收消息时,编译器会生成一个objc_super结构体。就上面的例子而言,这个结构体的receiver就是MyViewController对象,与self相同;superClass指向MyViewController的父类UIViewController。
接下来,发送消息时,不是调用objc_msgSend函数,而是调用objc_msgSendSuper函数,其声明如下:
id objc_msgSendSuper ( struct objc_super *super, SEL op, ... );
该函数第一个参数即为前面生成的objc_super结构体,第二个参数是方法的selector。该函数实际的操作是:从objc_super结构体指向的superClass的方法列表开始查找viewDidLoad的selector,找到后以objc->receiver去调用这个selector,而此时的操作就是如下方式了:
objc_msgSend(objc_super->receiver, @selector(viewDidLoad))
由于objc_super->receiver就是self本身,所以该方法实际与下面这个调用是相同的
objc_msgSend(self, @selector(viewDidLoad))
如下:
+ (void)load {
    [super load];
    NSLog(@"self class: %@", self.class);
    NSLog(@"super class: %@", super.class);
}
输出:
2018-05-04 15:19:45.264902+0800 RuntimeDemo[47032:2208798] self class: ViewController
2018-05-04 15:19:45.265792+0800 RuntimeDemo[47032:2208798] super class: ViewController
6.2 库相关操作
库相关的操作主要是用于获取由系统提供的库相关的信息,主要包含以下函数:
// 获取所有加载的Objective-C框架和动态库的名称
const char ** objc_copyImageNames ( unsigned int *outCount );

// 获取指定类所在动态库
const char * class_getImageName ( Class cls );

// 获取指定库或框架中所有类的类名
const char ** objc_copyClassNamesForImage ( const char *image, unsigned int *outCount );
通过这几个函数,我们可以了解到某个类所有的库,以及某个库中包含哪些类。如下代码所示:
- (void)testImage {
    NSLog(@"获取指定类所在动态库");
    NSLog(@"UIView's Framework: %s", class_getImageName(NSClassFromString(@"UIView")));
    NSLog(@"获取指定库或框架中所有类的类名");
    unsigned int outCount;
    const char ** classes = objc_copyClassNamesForImage(class_getImageName(NSClassFromString(@"UIView")), &outCount);
    for (int i = 0; i < outCount; i++) {
        NSLog(@"class name: %s", classes[i]);
    }
}
输出:
2018-05-04 15:30:51.342342+0800 RuntimeDemo[47333:2253385] 获取指定类所在动态库
2018-05-04 15:30:51.342499+0800 RuntimeDemo[47333:2253385] UIView's Framework: /Applications/Xcode.app/Contents/Developer/Platforms/iPhoneOS.platform/Developer/Library/CoreSimulator/Profiles/Runtimes/iOS.simruntime/Contents/Resources/RuntimeRoot/System/Library/Frameworks/UIKit.framework/UIKit
2018-05-04 15:30:51.342620+0800 RuntimeDemo[47333:2253385] 获取指定库或框架中所有类的类名
2018-05-04 15:30:51.343164+0800 RuntimeDemo[47333:2253385] class name: UIGestureKeyboardIntroduction
2018-05-04 15:30:51.343269+0800 RuntimeDemo[47333:2253385] class name: _UIPreviewPresentationPlatterView
2018-05-04 15:30:51.343364+0800 RuntimeDemo[47333:2253385] class name: UIKeyboardUISettings
2018-05-04 15:30:51.343456+0800 RuntimeDemo[47333:2253385] class name: _UIFocusScrollManager
2018-05-04 15:30:51.343550+0800 RuntimeDemo[47333:2253385] class name: _UIPickerViewTopFrame
2018-05-04 15:30:51.343655+0800 RuntimeDemo[47333:2253385] class name: _UIOnePartImageView
2018-05-04 15:30:51.343749+0800 RuntimeDemo[47333:2253385] class name: _UIPickerViewSelectionBar
。。。。。。。。。。。。。。。。。。。。。
6.3 块操作
我们都知道block给我们带到极大的方便,苹果也不断提供一些使用block的新的API。同时,苹果在runtime中也提供了一些函数来支持针对block的操作,这些函数包括:
// 创建一个指针函数的指针,该函数调用时会调用特定的block
IMP imp_implementationWithBlock ( id block );

// 返回与IMP(使用imp_implementationWithBlock创建的)相关的block
id imp_getBlock ( IMP anImp );

// 解除block与IMP(使用imp_implementationWithBlock创建的)的关联关系,并释放block的拷贝
BOOL imp_removeBlock ( IMP anImp );
imp_implementationWithBlock函数:参数block的签名必须是method_return_type ^(id self, method_args …)形式的。该方法能让我们使用block作为IMP。如下代码所示:
- (void)testBlock {
    IMP imp = imp_implementationWithBlock(^(id obj, NSString *str) {
        NSLog(@"testBlock - %@",str);
    });
    class_addMethod(self.class, @selector(testBlock:), imp, "v@:@");
    [self performSelector:@selector(testBlock:) withObject:@"邱学伟!"];
}
输出:
2018-05-04 15:41:47.221228+0800 RuntimeDemo[47587:2282146] testBlock - 邱学伟!
6.4 弱引用操作
操作函数:
// 加载弱引用指针引用的对象并返回
id objc_loadWeak ( id *location );

// 存储__weak变量的新值
id objc_storeWeak ( id *location, id obj );
objc_loadWeak函数:该函数加载一个弱指针引用的对象,并在对其做retain和autoreleasing操作后返回它。这样,对象就可以在调用者使用它时保持足够长的生命周期。该函数典型的用法是在任何有使用__weak变量的表达式中使用。
objc_storeWeak函数:该函数的典型用法是用于__weak变量做为赋值对象时。
